<<Back to Oracle RAC Main Page
Step by Step How to Install Oracle RAC (Real Application Cluster) on your Laptop
Note:- Installation of Oracle RAC is a very lengthy and time taking process and requires lots of preparation and co-ordination with different Teams in real environment. Since in this post you will perform all the tasks your own, it may take even more time. Keeping this point in mind and make the installation easier I have divided this post in several small posts which may be independently completed. lastly you have to be patient.
Step1: Planning and Understanding Hardware and Software Requirements for Oracle RAC installation on your Laptop.
Check out the post Minimum Hardware and Software Requirements to Install Oracle Real Application Cluster (Oracle RAC 12c) to complete this step
Step2: Download the Required Software
Check out the post How to Download Oracle Software from Oracle E- delivery and download the required software.
Step3: Create the Virtual Machines
Create the Virtual Servers with the configuration mentioned in step1. You can follow the instructions from post Step by Step how to Create Virtual Machine using Virtualbox
Step4: Install OS Oracle Enterprise Linux (OEL 7)
Follow the post Installing Oracle Enterprise Linux 7 for Oracle RAC Installation
and complete the OS installation. Perform the installation on all 3 Servers. 2 for RAC nodes and 1 for DNS and NTP
Step5: Install Open Filer for Shared Storage Preparation
Follow the instructions from How to Install OpenFiler Storage Management Appliance
Step6: Configure Openfiler and Discover the LUN on RAC nodes
Follow the instructions from Step by Step How to Configure Shared Storage for Oracle RAC Using Openfiler
Step7: Configure NTP.
Follow the instructions from How to Configure NTP Server for Oracle RAC Installation
NOTE: If you don't want to use NTP just de-configure it and let the Oracle Clusterware (CTSS) take care of time synchronization
Step8: Deconfigure NTP on Oracle RAC database Nodes
Step8 is only required if you don't have an NTP server to synchronize the time of the servers. De-configure it for all the RAC nodes in the cluster.
#systemctl stop ntpd.service
#systemctl status ntpd.service
#mv /etc/ntp.conf /etc/ntp.conf.org
# rm /var/run/ntpd.pid
Step9: Configure DNS
Follow the instruction from How to Configure DNS Server for Oracle RAC Installation
Step10: Prepare OS for Oracle RAC Installation
complete the Step10 (from A-F) as root for all the nodes
A: Add group and user
Add oinstall and dba group
#groupadd -g 500 oinstall
#groupadd -g 501 dba
Add oracle user
#useradd -u 500 -g oinstall -G dba oracle
Reset the password for user oracle
#passwd oracle
B : Create the directories and change ownership to Oracle
#mkdir -p /u01/app/12.2.0.1/grid
#mkdir -p /u01/app/oracle/product/12.2.0.1/dbp1
#chown -R oracle:oinstall /u01
#chmod -R 775 /u01/
C: Configure /etc/hosts.
Enter All the IPs (Public IPs, Private IPs, VIPs etc) in /etc/hosts as shown below. Each node must have all the IPs from all the nodes participating in the cluster including VIP and Private IPs.
#loopback address
127.0.0.1 localhost.localdomain localhost
# Public IP Address
192.9.1.100 node1.oracle.com node1
192.9.1.101 node2.oracle.com node2
192.9.1.105 storage.oracle.com storage
# Private IP Address
10.0.0.1 node1-priv.oracle.com node1-priv
10.0.0.2 node2-priv.oracle.com node2-priv
# Virtual IP Address
192.9.1.150 node1-vip.oracle.com node1-vip
192.9.1.151 node2-vip.oracle.com node2-vip
D: Disable SELINUX
If already not disabled this is the time you must disable SELINUX setting
Change the setting by editing the "/etc/selinux/config" file, making sure the SELINUX flag is set as follows
SELINUX=disable
E: Disable IPtables/firewall
If you have the Linux firewall enabled, you will need to disable or configure it, as shown here. The following is an example of disabling the firewall.
#systemctl stop iptables.service
#chkconfig iptables off
F: Enable NTP Slewing Option
The Option is only needed if you are using NTP for time synchronization. If your RAC is going to be permanently connected to your main network and you want to use NTP, you must add the "-x" option into the following line in the "/etc/sysconfig/ntpd" file.
OPTIONS="-x -u ntp:ntp -p /var/run/ntpd.pid"
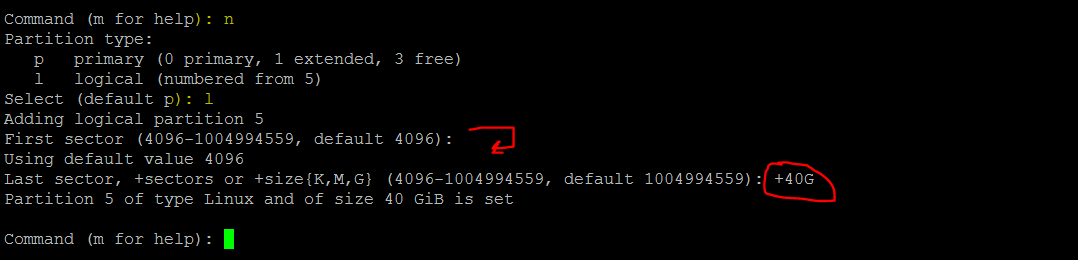
Step11: Prepare ASM Disks for Shared Storage
You have installed and configured openfiler in Step 5 and Step6. The shared LUN (/dev/sdb) from openfiler is discovered on your RAC node.
Create minimum 8 Partitions each 40GB in size as shown below. Use fdisk to create partitions
Note: You can do this as root user and you must do it only on one node.


Step12: Discover the Above Created partitions on Node2
Just execute the following command as root to sync the partition table on node2 as well
#partprobe
run fdisk –l to see if
the partitions are visible
Step13: Create ASM disk using ASM Lib
Follow the instruction at Step by Step How to Install and Configure Oracle asmlib Install and configure the ASMLIB and create the disk on one node and just discover it on 2nd node using oracleasm scandisks command.
Step14: Configure user equivalence for oracle user
On node1 & node2 as oracle user
$ssh-keygen –t rsa
$ssh-keygen –t dsa
On node1
$cd /home/oracle/.ssh
$cat *.pub>>node1
On node2
$cd /home/oracle/.ssh
$cat *.pub>>node2
On node1
$scp node1 node2:/home/oracle/.ssh
On node2
$scp node2 node1:/home/oracle/.ssh
On node1
$cat node*>>authorized_keys
On node2
$cat node*>>authorized_keys
Now test the ssh configuration, should work without Password
On node1
$ssh node1
$ssh node2
On Node2
$ssh node2
$ssh node1

Step15: Install Mandatory Packages for Oracle
Install following required RPMs (same or above version) on
both the nodes (node1, node2). Use rpm or yum to install.
binutils-2.23.52.0.1
compat-libcap1-1.10
libgcc-4.8.2
libstdc++-4.8.2
libstdc++-devel-4.8.2
sysstat-10.1.5
ksh
make-3.82
glibc-2.17
glibc-devel-2.17
libaio-0.3.109
libaio-devel-0.3.109
nfs-utils-1.2.3-15
smartmontools-6.2-4
net-tools-2.0-0.17
cvuqdisk-1.0.10-1
cvuqdisk-1.0.10-1.rpm is located under /u01/stage/database/rpm/
(location where you have extracted your grid binaries)
Step16: Configure Kernal Parameters
Configure Following Kernal
parameter on both nodes (Node1 and Node2)
Set Kernel Parameters in /etc/sysctl.conf file
fs.file-max = 6815744
kernel.sem = 250 32000 100 128
kernel.shmmni = 4096
kernel.shmall = 1073741824
kernel.shmmax = 4398046511104
kernel.panic_on_oops = 1
net.core.rmem_default = 262144
net.core.rmem_max = 4194304
net.core.wmem_default = 262144
net.core.wmem_max = 1048576
net.ipv4.conf.all.rp_filter = 2
net.ipv4.conf.default.rp_filter = 2
fs.aio-max-nr = 1048576
net.ipv4.ip_local_port_range = 9000 65500
# sysctl –p
Configure /etc/security/limits.conf file
oracle soft nofile
1024
oracle hard nofile
65536
oracle soft nproc
16384
oracle hard nproc
16384
oracle soft stack
10240
oracle hard stack
32768
oracle hard memlock
134217728
oracle soft memlock
134217728
Configure /etc/pam.d/login file
session required
/lib/security/pam_limits.so
Step17: Copy and unzip oracle database Software
Transfer the oracle Grid Infrastructure software and unzip it in the $GRID_HOME
Since I want to install grid software under /u01/app/12.2.0.1/grid.
I must unzip grid software at this location.
Step18: Perform RAC Installation PreCheck using Cluster Verification Utility from GI Home
As oracle user run cluster verification utility to perform the installation prerequisites
$cd under /u01/app/12.2.0.1/grid
./runcluvfy.sh stage -pre crsinst -n node1,node2 -fixup
-verbose
Fix any error /warning reported by runcluvfy. It is highly
advisable, not to ignore a single warning if you don't know the consequence
To fix Most common Issues reported during precheck Click Here
If pre-installation check of cluster verification utility returns success go ahead for oracle clusterware (RAC) installation
Login as Oracle user and execute gridSetup.sh from /u01/app/12.2.0.1/grid
./gridSetup.sh
Step19:
Follow the installer instruction as Shown below.
Choose Configure Oracle Grid Infrastructure for a New Cluster and click next

select configure an Oracle standalone Cluster and click next

Enter Cluster Name, Scan Name and Port and click Next

Click on Add button and add the 2nd Server

Click on SSH Connectivity
if you have already configured ssh you can test ssh configuration by clicking test button
to Setup the ssh you can click on Setup button
Click Next to proceed

Check if the proper Interface is selected. You can Change the Default listing from drop down list.
Click Next

Click Next

Click Next

Enter the disk Group Name.
if your disk is not listed here
Check if the disk discovery path is correct.Change if required
Check if the permission of the disk is correct

Select appropriate disks and click Next

Enter the diskgroup Name to house the GMIR and click Next

Specify the Password and and Click Next

Click Next

Click Next.

Choose the Groups accordingly and click Next


Enter Oracle base Directory and click Next
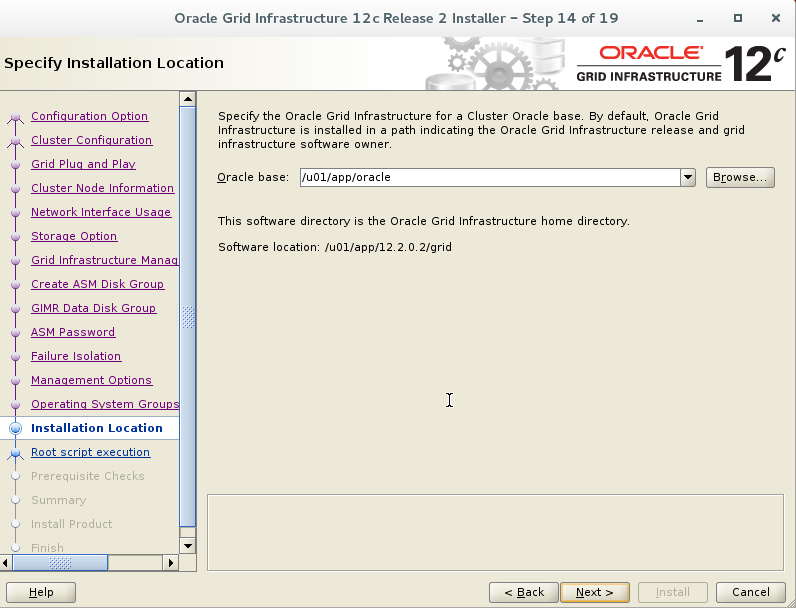
Click Next
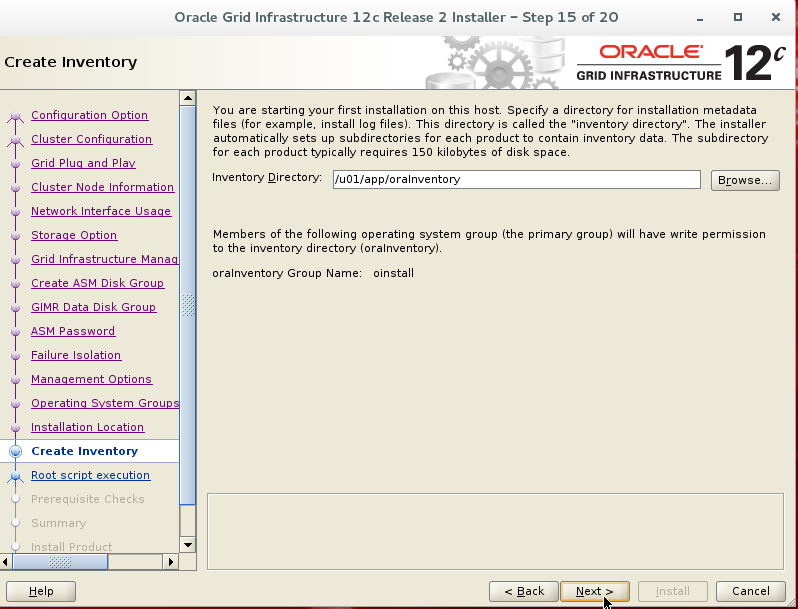
Click Next

Click Install to start the Installation


Execute the scripts. Ensure to execute serially exactly in the order listed below
On Node1
/u01/app/oraInventory/orainstRoot.sh
On Node2
/u01/app/oraInventory/orainstRoot.sh
On Node1
/u01/app/12.2.0.1/grid/root.sh
wait to finish the root.sh on node1.
On Node2:
/u01/app/12.2.0.1/grid/root.sh
Click ok only once the script execution on both the nodes are completed successfully
Note: Do not start the execution of script on node2 until it finish on node1
Note: Do not start the execution of script on node2 until it finish on node1

After successful installation of oracle clusterware you can verify the status as follows

Step By Step Oracle Rac 12C Release 2 (12C R2) Installation On Oracle Virtualbox With Oel7 >>>>> Download Now
ReplyDelete>>>>> Download Full
Step By Step Oracle Rac 12C Release 2 (12C R2) Installation On Oracle Virtualbox With Oel7 >>>>> Download LINK
>>>>> Download Now
Step By Step Oracle Rac 12C Release 2 (12C R2) Installation On Oracle Virtualbox With Oel7 >>>>> Download Full
>>>>> Download LINK ev